TABLE OF CONTENTS
- What you will need before you start?
- How to set up a BTC test payment?
- How to set up a USDT test payment?
- How to Use Test Mode to Simulate a Payment for Your Payment Button Order?
- How to check the results and callback logs?
The Test Mode in Blockonomics lets you simulate a BTC/USDT payment without using real money. It’s a safe way to make sure your payment setup works correctly before going live. With just a few clicks, you can test your store, verify callbacks, and confirm that everything is connected and receiving payments properly.
- For USDT Test Mode on WooCommerce, ensure you are using plugin version 3.9.1 or later
- BTC Test Mode works on all plugin versions, as it is fully handled server-side
- Test addresses are simulated. Do not send real BTC/USDT to these addresses, as funds sent will be lost and cannot be recovered.
What you will need before you start?
Before using the Test Mode, make sure you have:
- A Blockonomics account
- Your store added in Blockonomics. Click here to know how to add Store in Blockonomics.
- A wallet configured(BTC/USDT) in your dashboard. Click here to know how to add Wallets in Blockonomics.
- Once you have added the store, enable Testmode as shown below and click on Update Store.
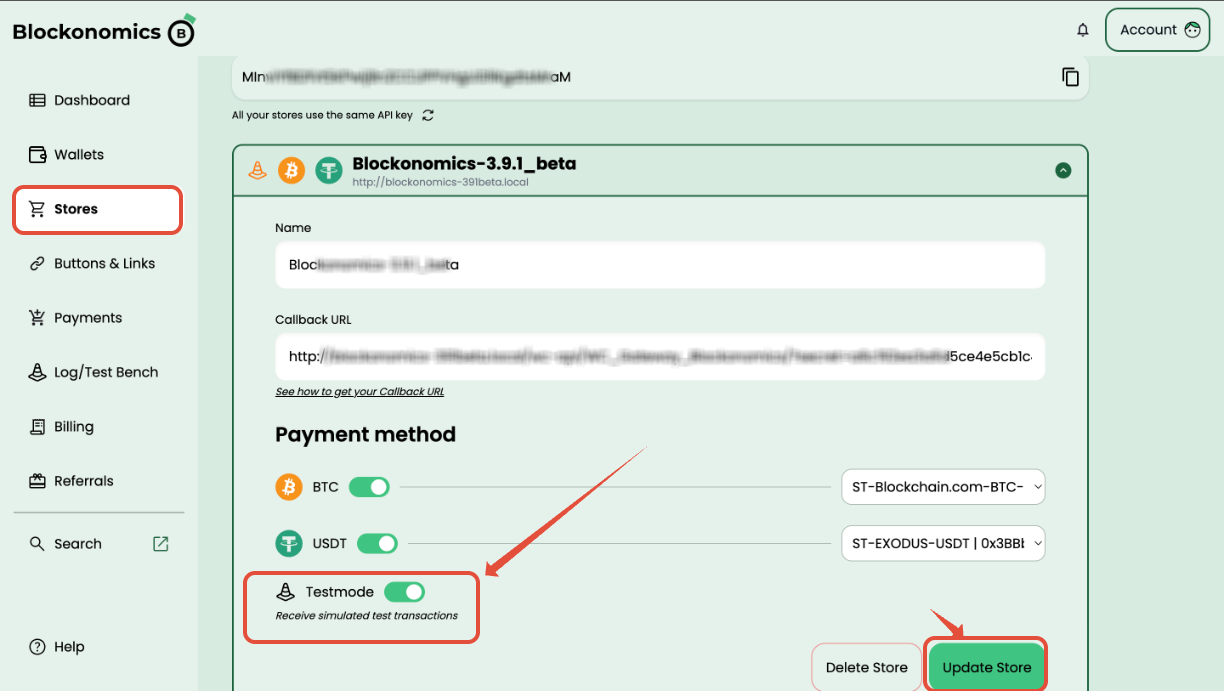
No real BTC/USDT is required, this test uses a simulated payment, so there is zero risk and no actual funds are used.
How to set up a BTC test payment?
Follow the steps below to simulate a Bitcoin payment using the Blockonomics Test Mode.
- Ensure that Test Mode is enabled for your store in Blockonomics. This allows you to simulate payments without using real Bitcoin.
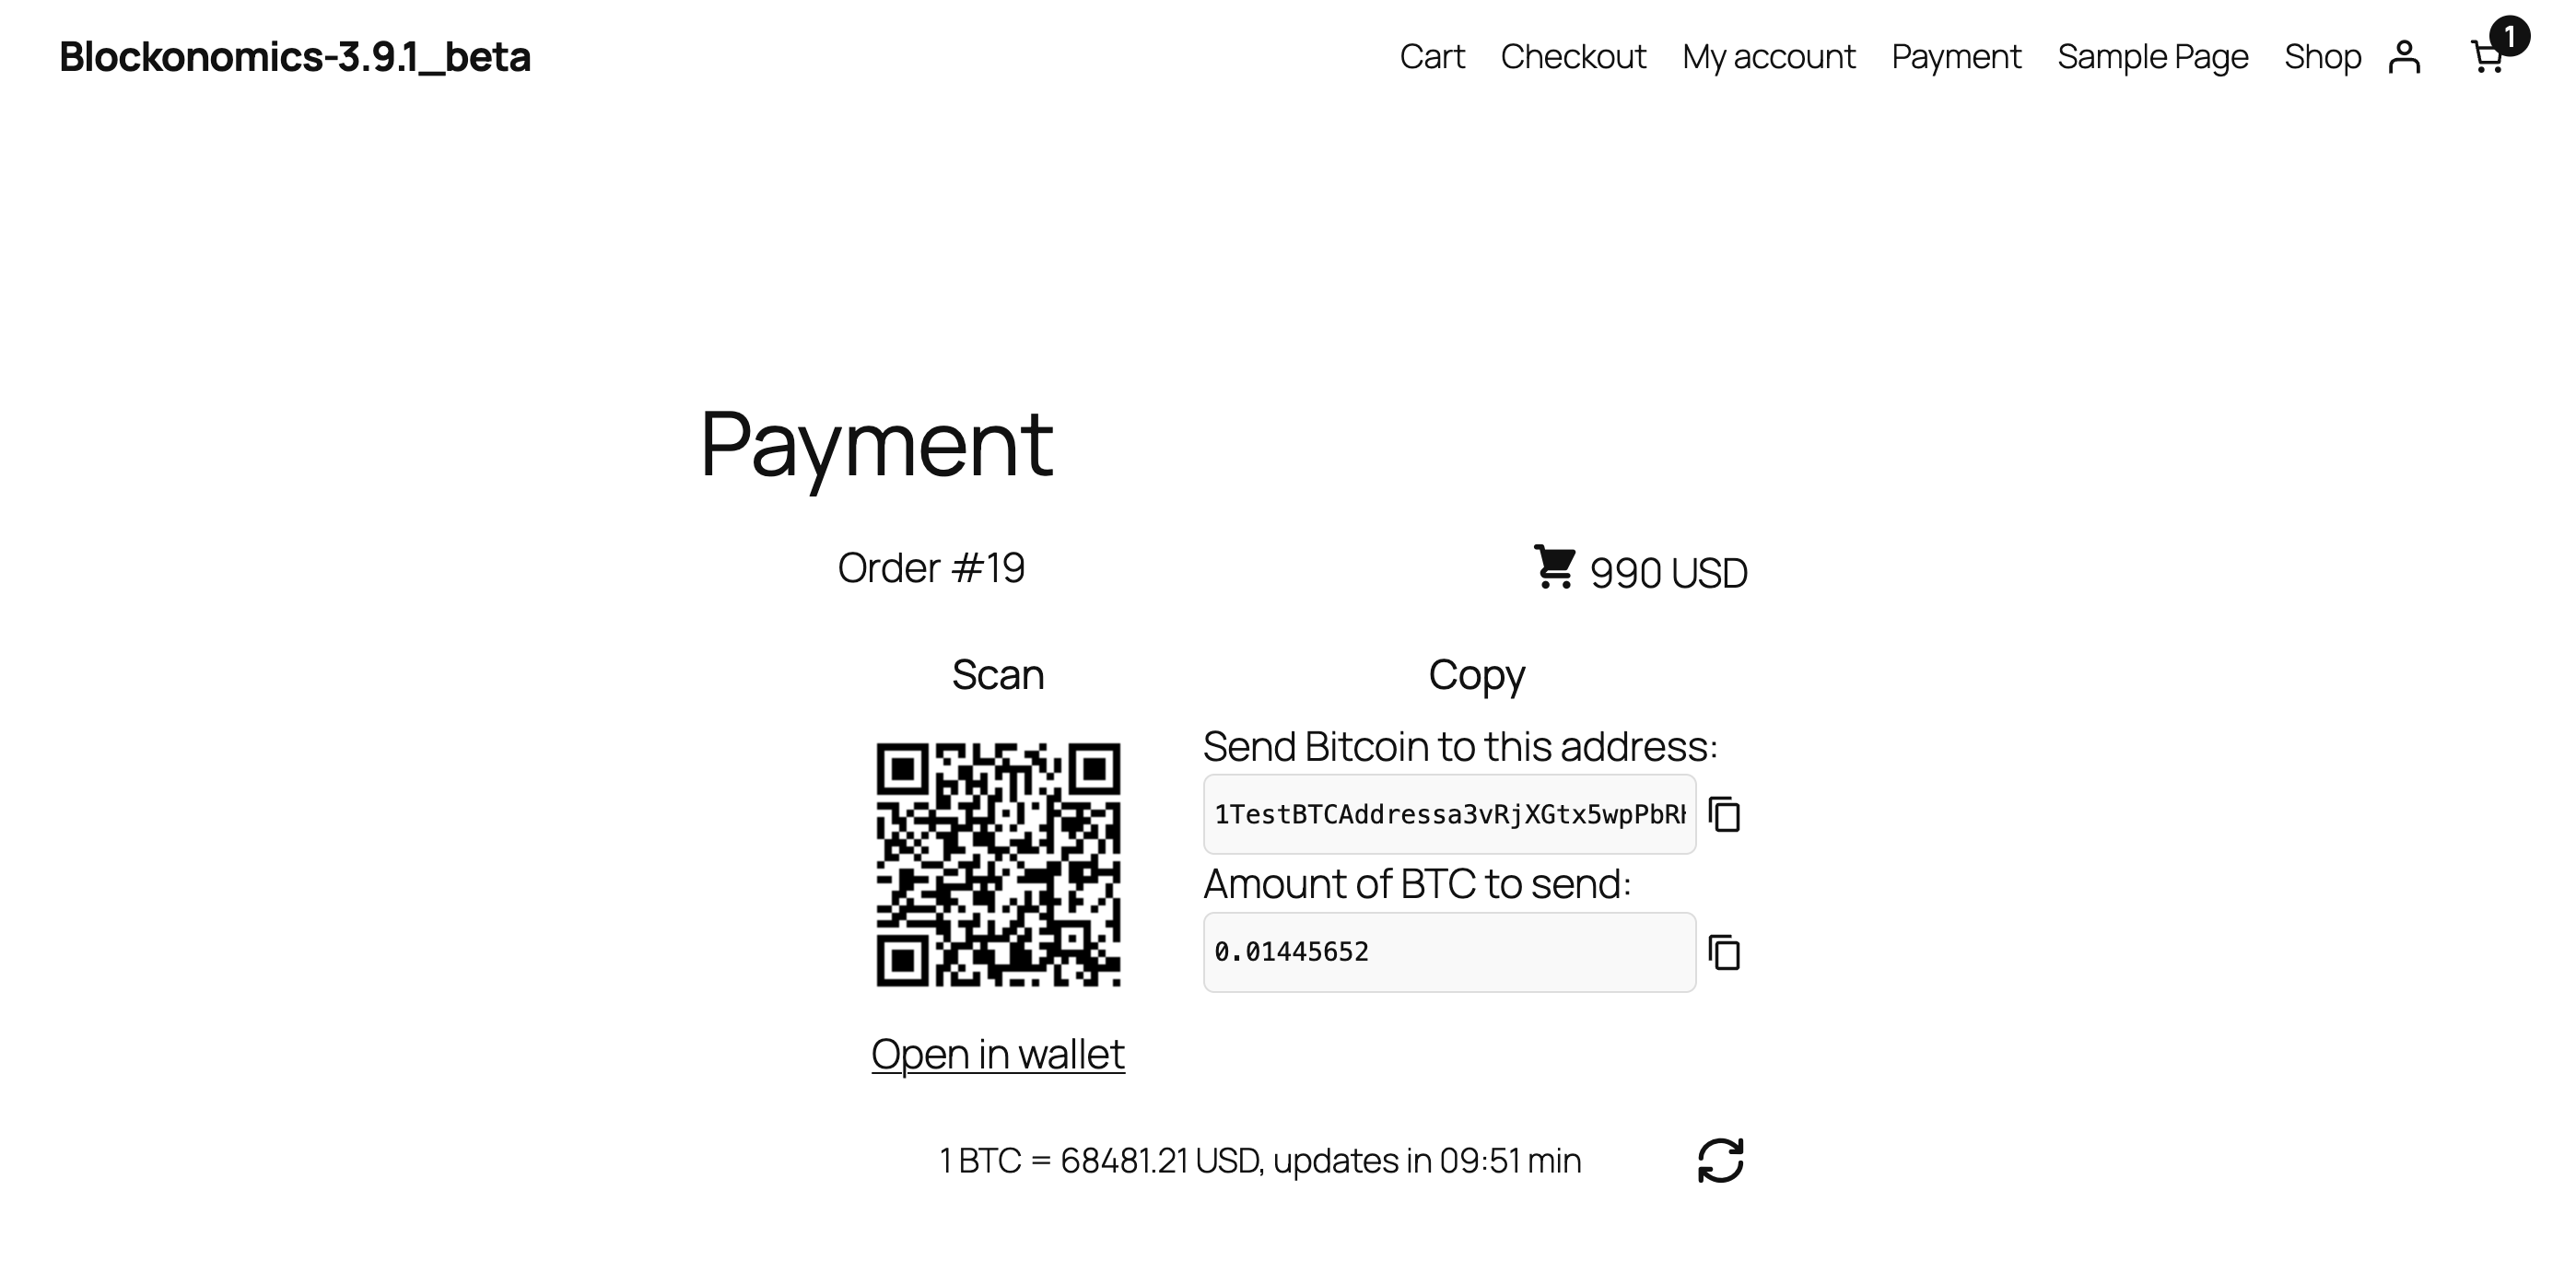
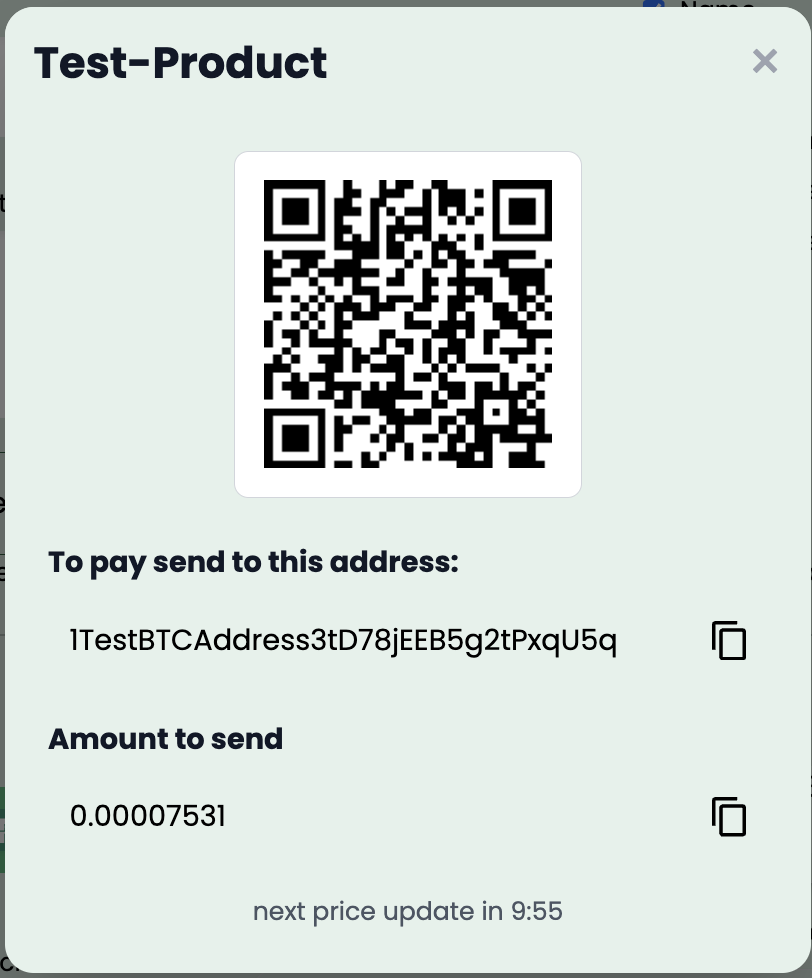
- Go to your store and place a test order. On your website, add any product to the cart and proceed to BTC checkout, just like a normal customer would.
- Generate the payment details, when you reach the Bitcoin payment page, you will see:
- A Bitcoin Test Address
- The exact BTC amount required for the order
Keep this page open, you will use these details in the Test Bench.
- Open the Blockonomics Test Bench and locate the Test Bitcoin Wallet section.
- Verify the Test Address in the Test Bench matches the Bitcoin address shown on your checkout page.
- Copy the BTC amount displayed on your website’s checkout page.
- Paste it into the BTC Amount field in the Test Bench.
- Click Send to simulate the transaction.


How to set up a USDT test payment?
Follow the steps below to simulate a USDT payment using the Blockonomics Test Mode.
Note: USDT Test Mode on WooCommerce requires Blockonomics plugin v3.9.1 or later. If you are using an older version, Test Mode may not work as expected.
- Ensure that Test Mode is enabled for your store in Blockonomics. This allows you to simulate payments without using real funds.
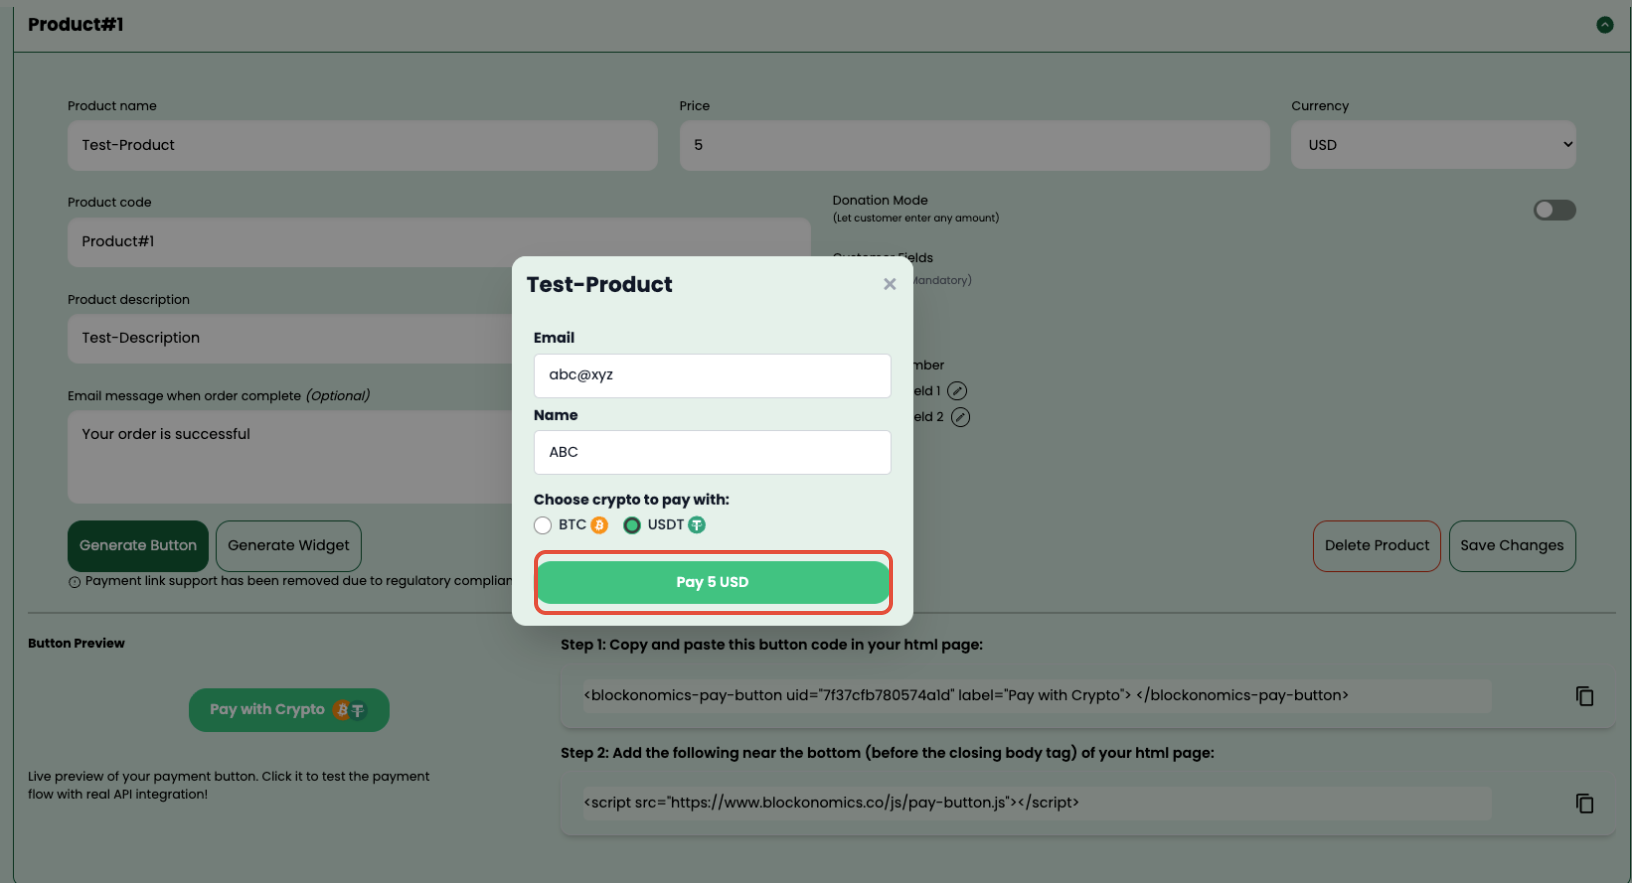
- Place a Test Order on Your Website: Visit your website as a customer would and add any product to the cart.
Proceed to checkout and select USDT as the payment method.
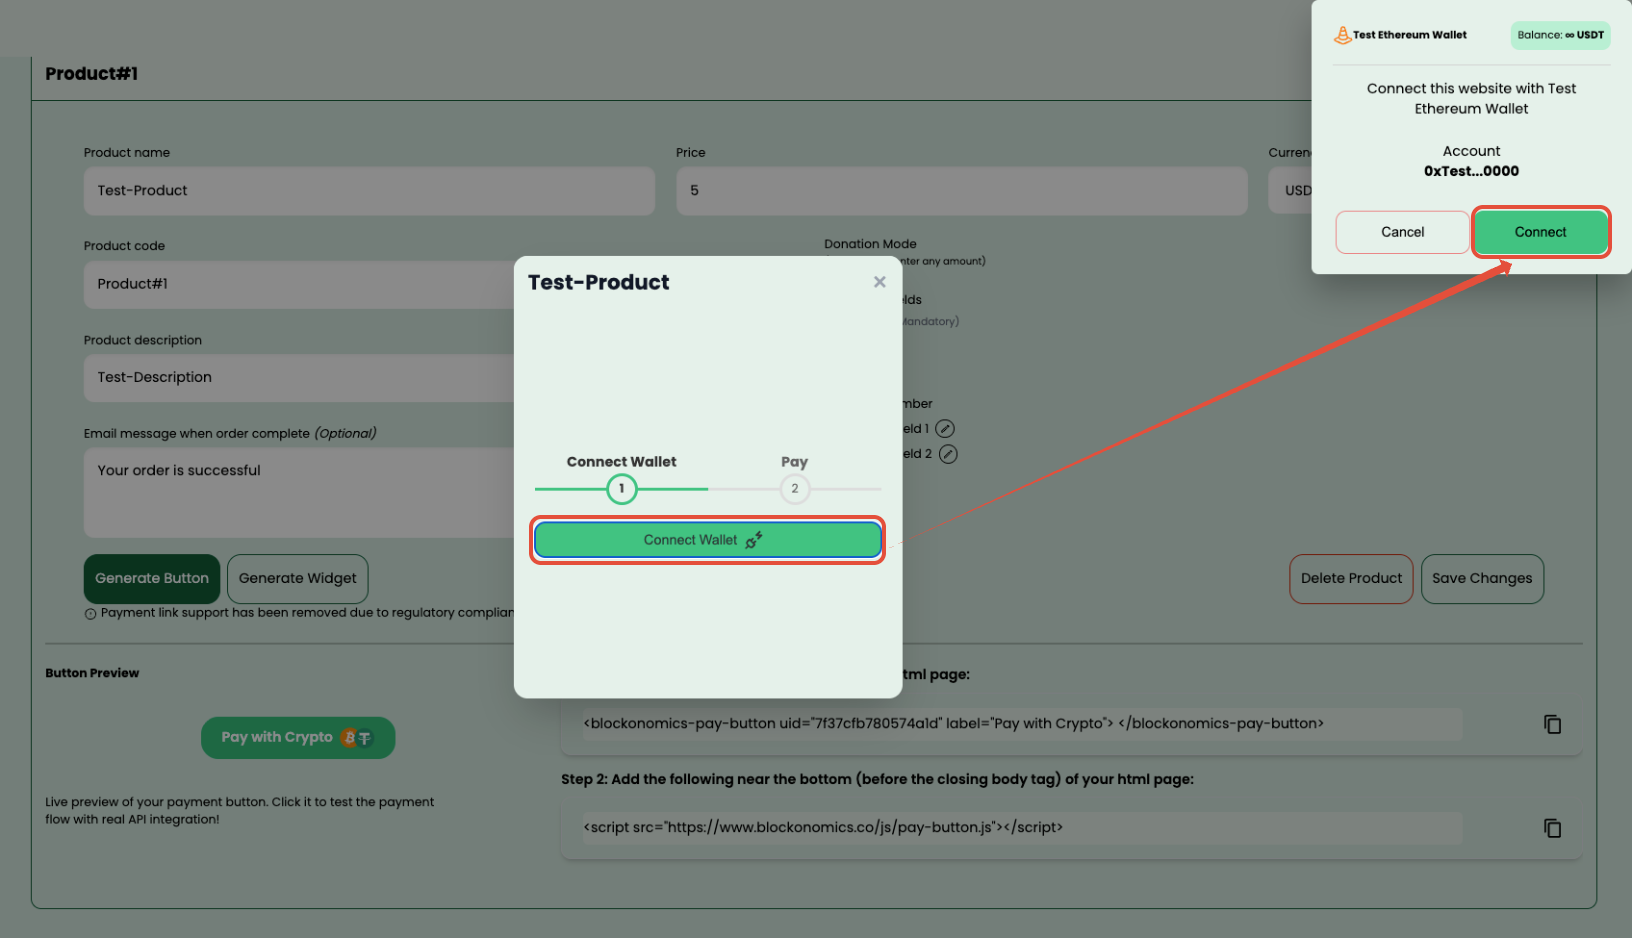
- Connect Your Wallet:
- On the payment page, click Connect Wallet.
- A wallet popup will appear showing your Test Ethereum Wallet.
- Click Connect to link your wallet to the checkout.
- Initiate the Payment
- Once connected, you will see your test wallet address and network details.
- Click the Pay [USDT Amount] button to initiate the transaction.
- A confirmation popup will appear in your wallet.
- Review the transaction details and click Confirm.


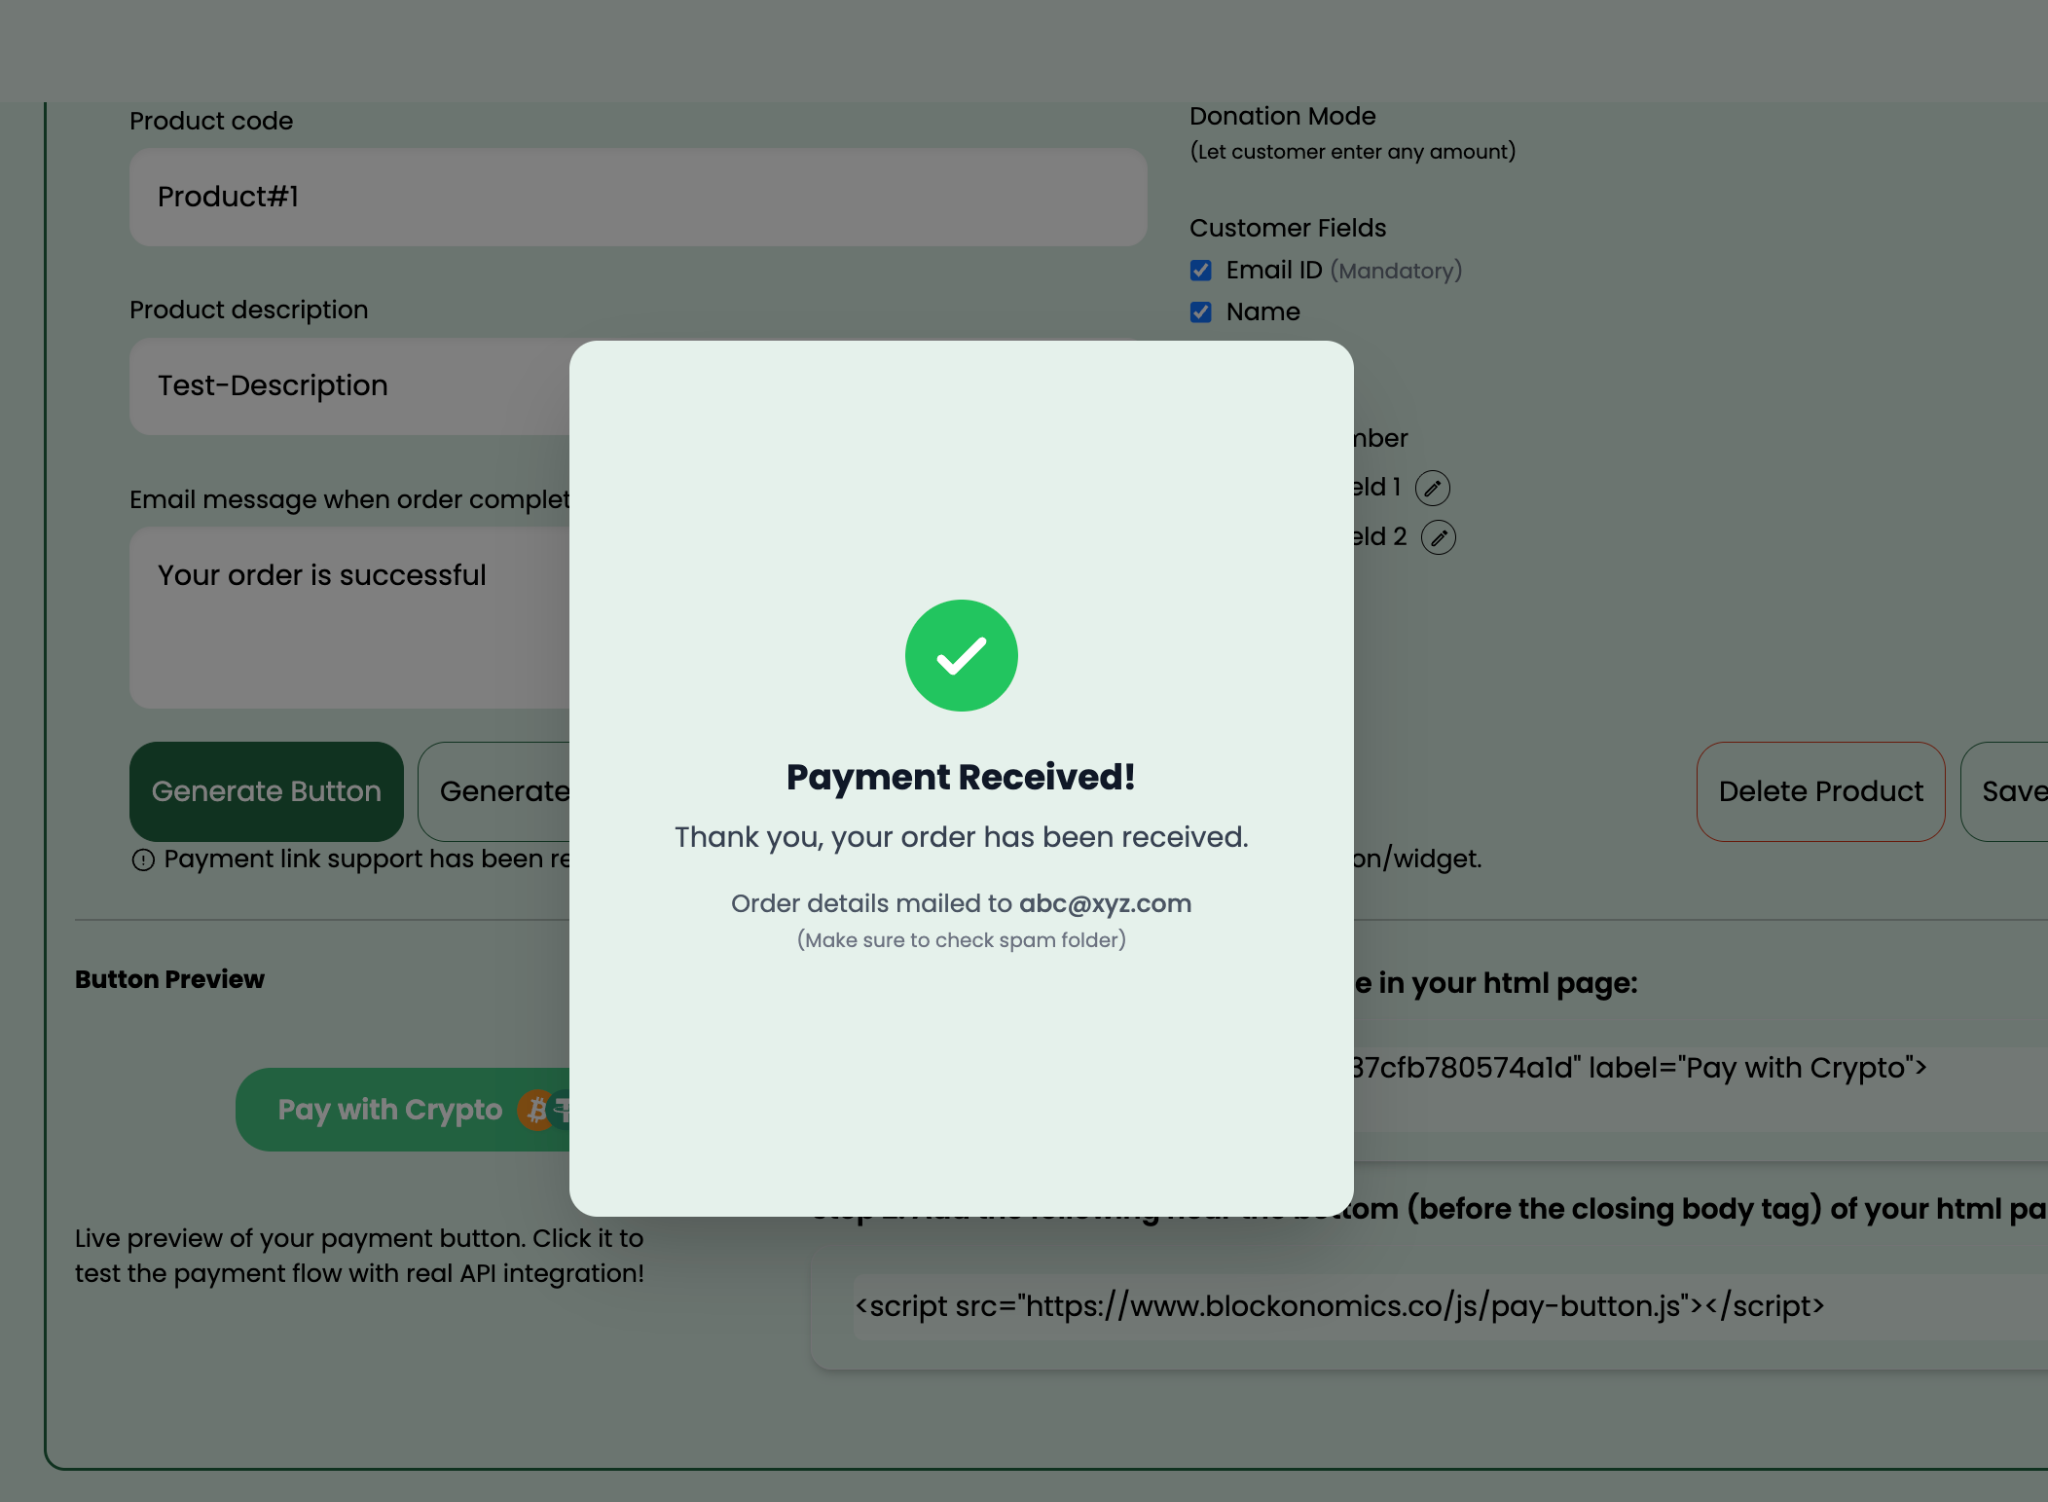
- Order Confirmation: After confirming the payment, you will be redirected to the Order Received page.

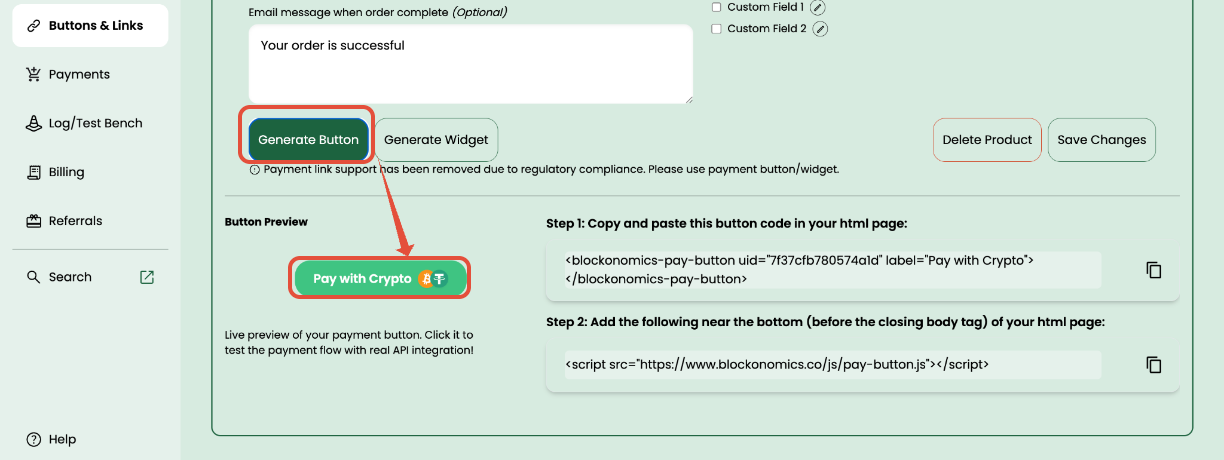
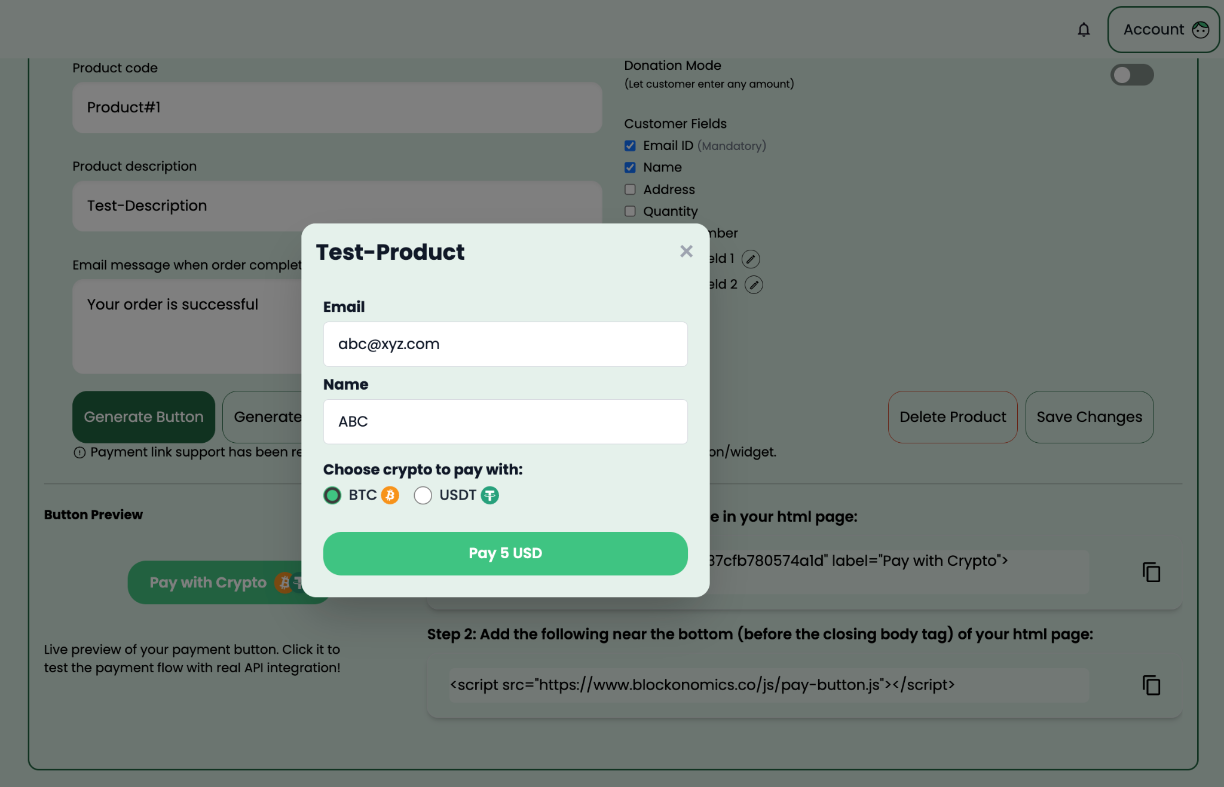
How to Use Test Mode to Simulate a Payment for Your Payment Button Order?


How to check the results and callback logs?
Blockonomics simulates real payment flows in Test Mode, including transaction detection and confirmation stages.
This applies to both BTC and USDT, allowing you to test how your system handles different payment statuses.
BTC Test Mode
- Status = 0 (Payment detected) → Callback sent instantly
- Status = 1 (Partial/1 confirmation) → Callback sent after ~5 minutes
- Status = 2 (Fully confirmed) → Callback sent after ~10 minutes
USDT Test Mode
- Callback is sent within ~1 minute
If you do not receive a callback immediately, please wait for the expected duration before retrying.
This delay is intentional and simulates real network confirmations.
Here’s how to verify the results:
- Go to your Blockonomics Dashboard → Logs / Test Bench.
You’ll see a list of test transactions with their current status. - Confirm successful callback (Status Code 200)
A successful callback will show a response ending with “200” this means your store received the callback correctly. - Match Bitcoin address and amount
Ensure the Bitcoin address and amount in the log match what you entered in the Test Bench.
- In WordPress → WooCommerce → Orders, locate your test order.
The order status will update according to the payment status - If you are not receiving a 200 status code, or callbacks are failing, please refer to our Callback Troubleshooting Guide for detailed steps to diagnose and resolve the issue.